| View previous topic :: View next topic |
| Author |
Message |
DLBass
Mad Brick Rider
Joined: 29 Jul 2010
Posts: 93
Location: Desborough UK
|
 Posted: Tue Apr 05, 2011 2:00 pm Post subject: Pilot/Parking lamp bulb replacement Posted: Tue Apr 05, 2011 2:00 pm Post subject: Pilot/Parking lamp bulb replacement |
 |
|
OK I admit to feeling a bit thick on this 
How the hell do you get to the pilot/parking lamp on the RS fairing to change the bulb? I can't even see the holder as it's behind a fairing bracket. Do I need to remove the screen, instruments or the headlamp unit?
I've just had hours of fun replacing the headlamp bulb. I wouldn't want to have to do that in the dark on a wet night anytime soon.
I've now retired to lick my skinned knuckles and have a cold one to celebrate having a new headlamp bulb in.
Thanks in advance
David
_________________
There is only now, yesterday is gone and is unchangeable, tomorrow is uncertain. Live in the moment. |
|
| Back to top |
|
 |
Tim (Midland Section)
Flying Brick Rider

Joined: 08 Apr 2005
Posts: 960
Location: Pinxton, Nottingham, England.
|
| Posted: Tue Apr 05, 2011 5:18 pm Post subject: |
|
|
I'll tell you how, when I've done mine. Found it popped, 1/2 hour & 8 miles from MOT time, rode in with headlights on, daft old bugger never noticed 
Either way it'll get a LED, too much of a PITA, like the clocks, just as soon as SWMBO releases me from decorating duty.
Wait a bit, an expert will be along soon.
_________________
Regards Tim,
Grey haired riders don't get that way by pure luck
1996 Guzzi Cali3 LAPD
1972 750 Commando
G6HRN
#485 |
|
| Back to top |
|
|
Mystic Red
Flying Brick Rider
Joined: 28 Mar 2005
Posts: 2330
Location: Twin Lakes Idaho
|
| Posted: Tue Apr 05, 2011 7:04 pm Post subject: |
|
|
You can remove the headlight assembly without removing the fairing. Take off the windscreen plate by removing the 6? screws and disconnect the screen electrical plug. That will give you almost enough room to work on the headlight.
_________________
Scott Hespelt, '94 K11LT
K11 OG #466 |
|
| Back to top |
|
|
drikko
Flying Brick Rider
Joined: 20 Nov 2009
Posts: 1966
Location: Brisbane, OZ
|
| Posted: Tue Apr 05, 2011 7:07 pm Post subject: |
|
|
Mysticred, you're talking LT rather than RS which are different. Can't help you either as I've never done it, but I do agree, it looks next to impossible!!
_________________
K1100RS '97
Laverda RGS 1000 '84
Jim Young Trailer Sailer 5.7M WB
DISCLAIMER:- Anything I say may have been when I was drunk so please don't take it personally.
'Bigamy is having one wife/husband too many. Monogamy is the same.'
Oscar Wilde |
|
| Back to top |
|
|
Flying Duck
PsyKotic Waterfowl

Joined: 27 Jan 2005
Posts: 10087
Location: Bumf***, WA
|
| Posted: Tue Apr 05, 2011 10:26 pm Post subject: |
|
|
It'll probably be easier if you take the windscreen off. I did this LED install in situ.
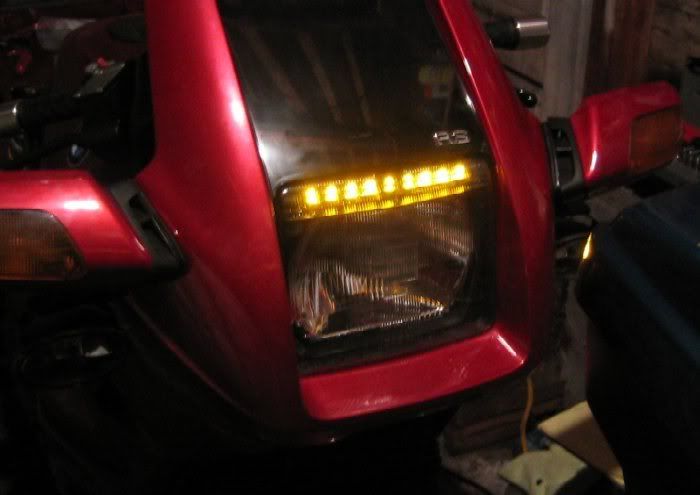
Turn the bulb holder counterclockwise to get it out.
MR: Only four screws attach the headlight to the fairing.
_________________
93 LT (x2)
94 RS
86-97 K75F(K75/100/1100 Frankenbrick)
86 K75C w/paralever, hi perf cams,TURBO!
91 & 92 K75Ss
91 K1
86 custom K100
14 WR250R
IBA #17739 (SS1K, BBG, 50CC)
Buy parts HERE |
|
| Back to top |
|
|
DLBass
Mad Brick Rider
Joined: 29 Jul 2010
Posts: 93
Location: Desborough UK
|
| Posted: Wed Apr 06, 2011 11:39 am Post subject: |
|
|
Thanks Duck
It looks like the screen is coming off then 
Definitely putting an LED in. So I don't have to do this again
David
_________________
There is only now, yesterday is gone and is unchangeable, tomorrow is uncertain. Live in the moment. |
|
| Back to top |
|
|
rbm
Mad Brick Rider
Joined: 02 Jun 2009
Posts: 115
Location: Toronto
|
| Posted: Wed Apr 06, 2011 7:31 pm Post subject: |
|
|
| Flying Duck wrote: | | It'll probably be easier if you take the windscreen off. I did this LED install in situ. |
I did the same modification to my K100RT a couple weeks ago. Very easy and trouble-free once done.
Look for Flexible SMD Light Ribbon (similar to what's illustrated near the bottom of this page). This comes in a roll and the vendor will snip off the length you specify so measure the width of the headlamp assembly and subtract an inch to give some inside slack. Solder two 18GGA leads to the SMD ribbon and crimp on 1/4" male connectors. Make the leads long enough that they are 3/4 of the length of the SMD ribbon. Test on the bench before inserting the assembly into the headlamp.
To insert, remove and discard the old pilot lamp base. Fold the ribbon in half and insert on both ends into the hole where the lampbase was. Carefully fish the ribbon into the headlamp until fully inserted and the two male connectors are hanging out the hole. Easy peasy.
_________________
- Robert
1987 K75 @k75retro.blogspot.ca
2011 Moto Guzzi V7 Racer |
|
| Back to top |
|
|
Flying Duck
PsyKotic Waterfowl
Joined: 27 Jan 2005
Posts: 10087
Location: Bumf***, WA
|
| Posted: Wed Apr 06, 2011 7:48 pm Post subject: |
|
|
Mine's actually 18 LEDs mounted on a circuit board so I needed to take the lens off. That cutable strip stuff is handy though.
_________________
93 LT (x2)
94 RS
86-97 K75F(K75/100/1100 Frankenbrick)
86 K75C w/paralever, hi perf cams,TURBO!
91 & 92 K75Ss
91 K1
86 custom K100
14 WR250R
IBA #17739 (SS1K, BBG, 50CC)
Buy parts HERE |
|
| Back to top |
|
|
|

